Windows XP on the Lenovo ThinkCentre M93P Tiny
Introduction
The Lenovo ThinkCentre M93P Tiny is a small yet capable computer in a form
factor not much larger than a thick hardcover book.
It sports a Haswell-based Intel CPU, up to 16 GB of DDR3L RAM, optional wifi,
and plenty of USB 3.0 ports.
Officially, the only operating systems supported are Windows 7 SP1 and
Windows 8.1; Windows 10 will also work with the Windows 8.1 drivers.
But what about Windows XP?
Drivers and Preparation
Believe it or not, official drivers exist for most of the hardware
inside the ThinkCentre. The only real unofficial driver or modification
you need to make is to
integrate the SATA driver into the Windows XP installation medium,
otherwise no hard disks will be detected.
I have collected drivers for both regular Windows XP and Windows XP Professional
x64 Edition. I suggest using the x64 edition; not only is the CPU 64-bit,
but if you have more than 4 GB of RAM, the rest will be wasted.
This guide will focus mostly on the x64 edition, but the steps should be
similar for the x86/32-bit version.
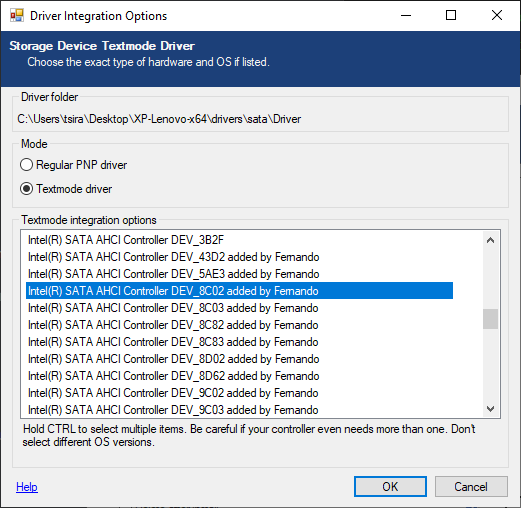
To do this, I suggest using nLite.
Plenty of guides exist for how to integrate drivers, but all you need
to do is select iaStor.inf and choose your specific device ID.
For me, the device ID 8C02 corresponds to the SATA controller in my
unit, but if in doubt, just select them all.
The driver is found under the sata\Driver directory in the pack.
Afterwards, save the customized Windows install media and burn it onto a disc.
You will need an external USB optical drive, or if you have it, the official
optical drive from Lenovo.
System Installation
BEFORE DOING ANYTHING ELSE, ensure your BIOS is configured correctly!
Most importantly, the CSM (Compatibility Support Module) must be on,
and the boot method set to "Legacy Only".
Furthermore, ensure your hard drive or SSD you will be installing XP onto
is formatted as MBR and not GPT.
(Side note: Windows XP Professional x64 Edition can read and write -
but not boot from - GPT formatted disks. MBR is still needed.)
Afterwards, boot from your optical drive and install Windows XP as if it
were any other install. The custom SATA driver should load itself and
detect your hard drive or SSD.
Once the system reboots to the XP desktop, the driver installation madness can begin.
Driver Installation
The first driver to be installed should be for the chipset. Simply run chipset.exe from the driver pack you downloaded earlier. Then reboot.
Next, for the video driver, the .NET Framework 3.5 must annoyingly be installed
first. This is included in the driver pack.
After that, run setup.exe from inside the video folder.
Reboot again.
For the networking, I have only tested the ethernet controller and not wifi,
because my particular unit does not have wifi installed.
In any case, the Intel ethernet controller can be installed by opening Device
Manager, right clicking on the ethernet controller, and selecting to update
the driver.
The drivers are under the path ethernet\PRO1000\WinXP_Related\x64
for Windows XP x64 Edition, and ethernet\PRO1000\WinXP_Related\PCIe
for the 32-bit version.
Reboot once more.
Finally, install the audio by running audio.exe and reboot. And that's it for the drivers!
Finishing Touches
For some finishing touches, I suggest installing a few updates that I have bundled with the driver pack.
Namely, this includes CRITICAL OUT-OF-BAND SECURITY UPDATES
to prevent attacks that have been exploited in the past, including the WannaCry
ransomware.
These updates are KB4012598 (WannaCry) and KB4500331 (Remote Desktop Services
arbitrary code execution).
The other update is to add support for exFAT-formatted volumes (KB955704), which is quite useful.